The Product Concept Visualizer: Transforme Qualquer Ideia em um Photorealistic Mockup com um único Prompt
Why this prompt matters
Most product ideas never get visualized because hiring a designer takes days and costs money. This prompt gives founders, product managers, and indie makers a way to render any product concept in seconds — good enough for investor decks, landing pages, and user testing before a single dollar is spent on production.
What we use it for
Generate photorealistic product concept images for pitches, portfolios, and prototyping — no designer or studio required.
Prompt
Create a photorealistic product concept image of [PRODUCT NAME]: [2-sentence description of what it is and what it does]. Show it as a polished commercial product — [MATERIAL/FINISH] casing, [COLOR SCHEME] color palette, on [BACKGROUND: white studio / lifestyle setting / dark premium]. Include [KEY FEATURE: a display, a button arrangement, a logo area, a charging port, etc.]. Style: product photography, 50mm lens, soft studio lighting, slight shadow underneath. High detail, commercial-ready.
Result
The Prompt Formula
Copy this template and fill in the brackets for any product you want to visualize:
Create a photorealistic product concept image of [PRODUCT NAME]: [2-sentence description of what it is and what it does]. Show it as a polished commercial product — [MATERIAL/FINISH] casing, [COLOR SCHEME] color palette, on [BACKGROUND: white studio / lifestyle setting / dark premium]. Include [KEY FEATURE: a display, a button arrangement, a logo area, a charging port, etc.]. Style: product photography, 50mm lens, soft studio lighting, slight shadow underneath. High detail, commercial-ready.Example Output
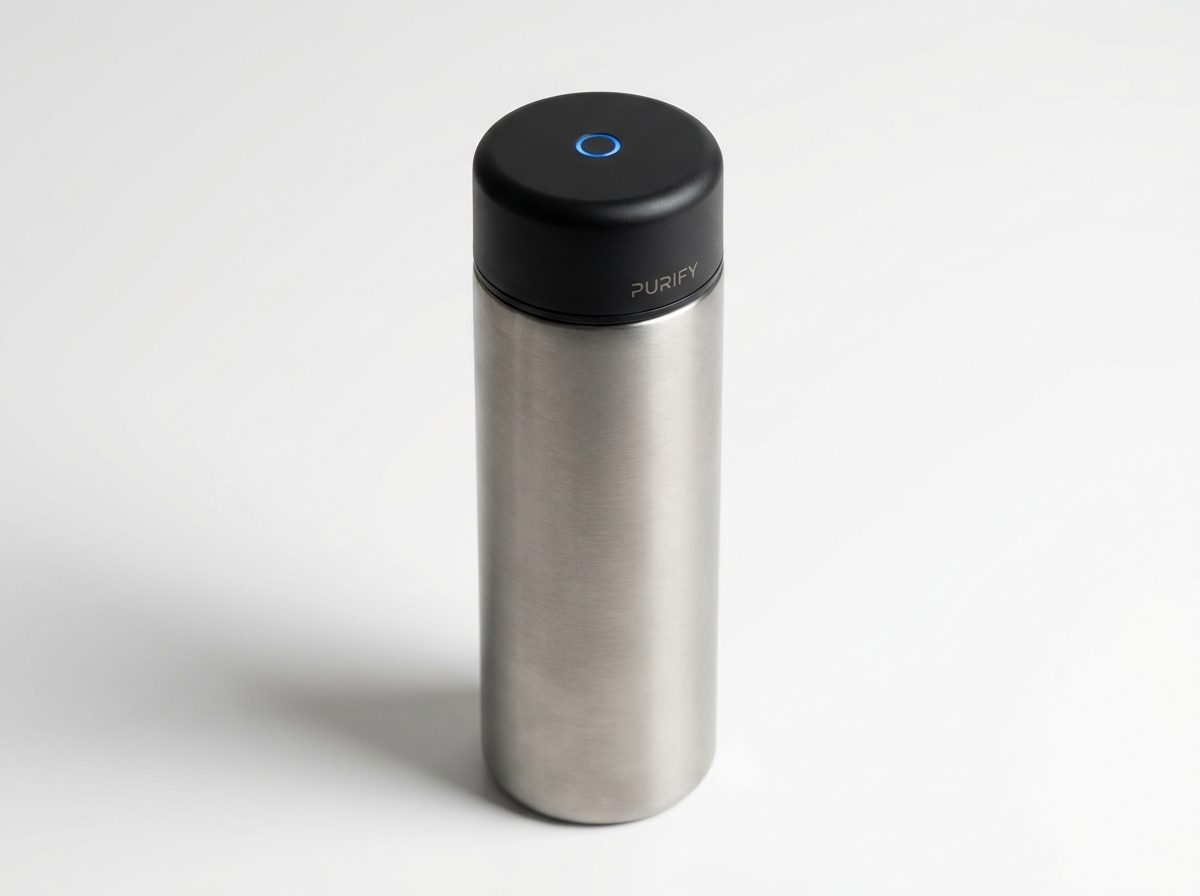
Here is what the formula produces for a smart water bottle concept:
"Create a photorealistic product concept image of a smart water bottle with a built-in UV-C purifier cap: a sleek cylindrical bottle that sterilizes water using ultraviolet light in the cap. Show it as a polished commercial product — brushed titanium and matte black finish, on a white studio background. Include a small circular UV LED indicator glowing blue on the cap and a minimal branding area. Style: product photography, 50mm lens, soft studio lighting, slight shadow underneath. High detail, commercial-ready."
The result (shown above) is a render indistinguishable from a professional product photographer's work — generated in under 30 seconds.
How to Customize It
The four variables that most affect the output quality are:
- Material + finish — be specific: "anodized aluminum", "soft-touch matte plastic", "brushed stainless steel with a glossy glass face". Vague materials produce vague renders.
- Background — "white studio" gives the cleanest e-commerce look. "Lifestyle" (e.g., "sitting on a kitchen counter") adds context. "Dark premium" suggests luxury pricing.
- Key feature callout — name the one visual element that makes the product recognizable. For a fitness tracker: "an always-on AMOLED display showing a heart rate graph". For a speaker: "a circular grille with a glowing ring LED".
- Color palette — give it a name or a hex code. "Forest green and brushed copper", "Space gray", "#1A1A2E dark navy with gold trim" all produce distinct and consistent results.
Practical Use Cases
- Investor decks — visualize a product before prototyping to test whether the concept reads well on a slide
- Landing pages — collect emails or pre-orders for a product that doesn't exist yet
- User research — show multiple visual variants to early users and measure which resonates before committing to a design
- App store assets — generate hero images for software products shown inside a device frame
- Social media — product teasers for launches or announcements without a physical sample
Which Models Work Best
This prompt works across all major image generators, but the output style varies:
- DALL-E 3 / GPT Image — cleanest white-background studio shots, best for e-commerce style
- Midjourney v7 — highest photorealism for lifestyle and premium dark backgrounds
- Flux Pro 1.1 — fastest iteration, good for testing color variants quickly
- Stable Diffusion / ComfyUI — most customizable if you want consistent brand colors across multiple renders
Start with whichever model you already use. The formula works with all of them — the variable that matters most is how specific your description is, not which model runs it.
One More Tip
Add "—no text, no labels" at the end if you don't want the model to hallucinate product names or fictional branding on the product surface. Most models will leave text off by default, but this instruction makes it explicit.
Generated Image
A Fórmula do Prompt
Copie este template e preencha os colchetes para qualquer produto que queira visualizar:
Create a photorealistic product concept image of [PRODUCT NAME]: [2-sentence description of what it is and what it does]. Show it as a polished commercial product — [MATERIAL/FINISH] casing, [COLOR SCHEME] color palette, on [BACKGROUND: white studio / lifestyle setting / dark premium]. Include [KEY FEATURE: a display, a button arrangement, a logo area, a charging port, etc.]. Style: product photography, 50mm lens, soft studio lighting, slight shadow underneath. High detail, commercial-ready.Exemplo de Saída
Aqui está o que a fórmula gera para um conceito de garrafa de água inteligente:
"Create a photorealistic product concept image of a smart water bottle with a built-in UV-C purifier cap: a sleek cylindrical bottle that sterilizes water using ultraviolet light in the cap. Show it as a polished commercial product — brushed titanium and matte black finish, on a white studio background. Include a small circular UV LED indicator glowing blue on the cap and a minimal branding area. Style: product photography, 50mm lens, soft studio lighting, slight shadow underneath. High detail, commercial-ready."
O resultado (mostrado acima) é um render indistinguível do trabalho de um fotógrafo profissional de produtos — gerado em menos de 30 segundos.
Como Personalizar
As quatro variáveis que mais afetam a qualidade do resultado são:
- Material + acabamento — seja específico: "alumínio anodizado", "plástico matte soft-touch", "aço inoxidável escovado com superfície de vidro brilhante". Materiais vagos produzem renders vagos.
- Background — "white studio" dá a aparência mais limpa de e-commerce. "Lifestyle" (ex.: "sobre um balcão de cozinha") adiciona contexto. "Dark premium" sugere preço premium.
- Destaque do recurso principal — nomeie o elemento visual que torna o produto reconhecível. Para um fitness tracker: "um display AMOLED always-on mostrando um gráfico de frequência cardíaca". Para uma caixa de som: "uma grade circular com um anel LED brilhante".
- Paleta de cores — dê um nome ou um código hexadecimal. "Forest green and brushed copper", "Space gray", "#1A1A2E dark navy with gold trim" todos produzem resultados distintos e consistentes.
Casos de Uso Práticos
- Investor decks — visualize um produto antes de prototipar para testar se o conceito funciona bem em um slide
- Landing pages — colete e-mails ou pré-vendas de um produto que ainda não existe
- User research — mostre múltiplas variantes visuais a usuários iniciais e meça qual ressoa antes de se comprometer com um design
- App store assets — gere hero images para produtos de software mostrados dentro de um frame de dispositivo
- Social media — teasers de produto para lançamentos ou anúncios sem uma amostra física
Quais Modelos Funcionam Melhor
Este prompt funciona em todos os principais geradores de imagem, mas o estilo da saída varia:
- DALL-E 3 / GPT Image — as fotos de estúdio com fundo branco mais limpas, melhores para estilo e-commerce
- Midjourney v7 — o mais alto fotorrealismo para lifestyle e fundos escuros premium
- Flux Pro 1.1 — iteração mais rápida, bom para testar variantes de cor rapidamente
- Stable Diffusion / ComfyUI — o mais customizável se você quiser cores de marca consistentes em múltiplos renders
Comece com o modelo que você já usa. A fórmula funciona com todos eles — a variável que mais importa é o quão específica é sua descrição, não qual modelo a executa.
Mais Uma Dica
Adicione "—no text, no labels" ao final se não quiser que o modelo alucine nomes de produtos ou branding fictício na superfície do produto. A maioria dos modelos deixa o texto de fora por padrão, mas esta instrução torna isso explícito.