<div><p>Product Concept Visualizer: هر ایدهای را با یک پرامپت به یک ماکاپ فوتورئالیستی تبدیل کنید.</p></div>
Why this prompt matters
Most product ideas never get visualized because hiring a designer takes days and costs money. This prompt gives founders, product managers, and indie makers a way to render any product concept in seconds — good enough for investor decks, landing pages, and user testing before a single dollar is spent on production.
What we use it for
Generate photorealistic product concept images for pitches, portfolios, and prototyping — no designer or studio required.
Prompt
Create a photorealistic product concept image of [PRODUCT NAME]: [2-sentence description of what it is and what it does]. Show it as a polished commercial product — [MATERIAL/FINISH] casing, [COLOR SCHEME] color palette, on [BACKGROUND: white studio / lifestyle setting / dark premium]. Include [KEY FEATURE: a display, a button arrangement, a logo area, a charging port, etc.]. Style: product photography, 50mm lens, soft studio lighting, slight shadow underneath. High detail, commercial-ready.
Result
The Prompt Formula
Copy this template and fill in the brackets for any product you want to visualize:
Create a photorealistic product concept image of [PRODUCT NAME]: [2-sentence description of what it is and what it does]. Show it as a polished commercial product — [MATERIAL/FINISH] casing, [COLOR SCHEME] color palette, on [BACKGROUND: white studio / lifestyle setting / dark premium]. Include [KEY FEATURE: a display, a button arrangement, a logo area, a charging port, etc.]. Style: product photography, 50mm lens, soft studio lighting, slight shadow underneath. High detail, commercial-ready.Example Output
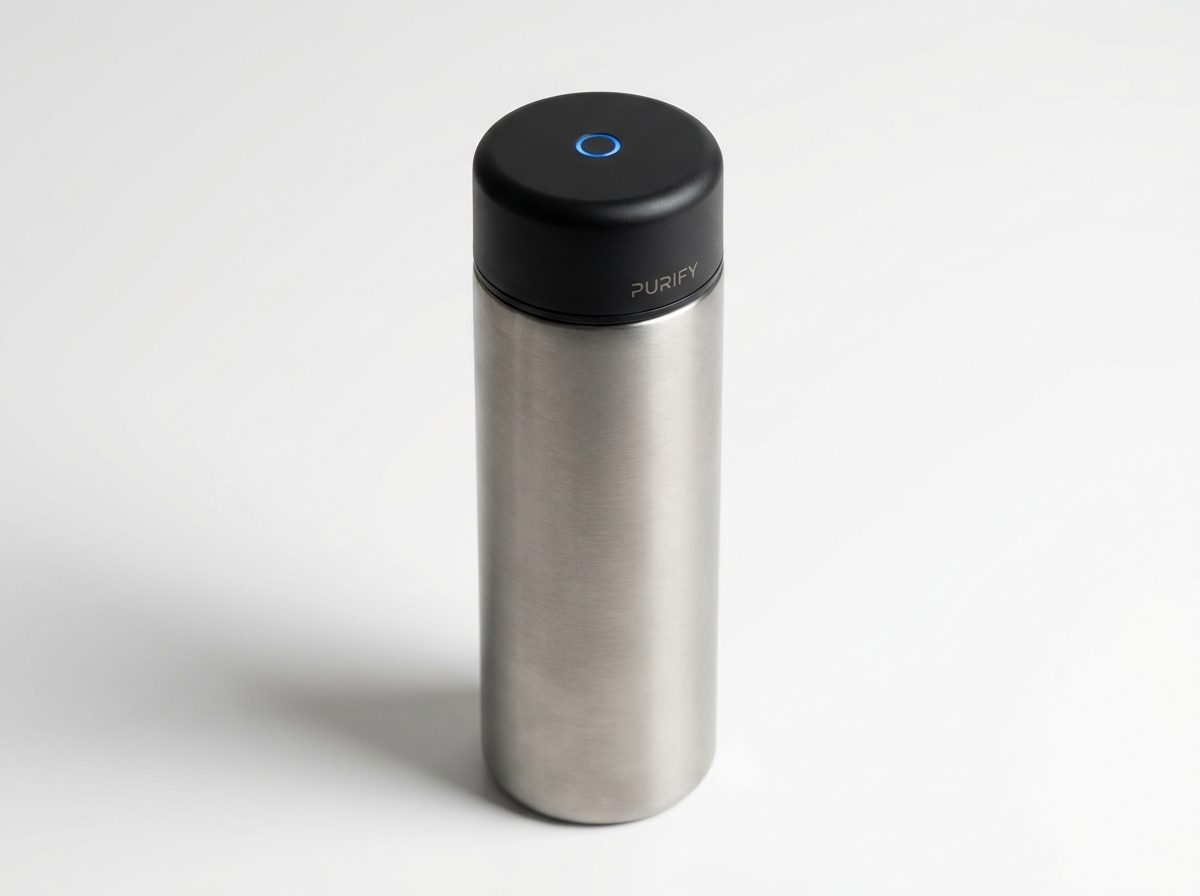
Here is what the formula produces for a smart water bottle concept:
"Create a photorealistic product concept image of a smart water bottle with a built-in UV-C purifier cap: a sleek cylindrical bottle that sterilizes water using ultraviolet light in the cap. Show it as a polished commercial product — brushed titanium and matte black finish, on a white studio background. Include a small circular UV LED indicator glowing blue on the cap and a minimal branding area. Style: product photography, 50mm lens, soft studio lighting, slight shadow underneath. High detail, commercial-ready."
The result (shown above) is a render indistinguishable from a professional product photographer's work — generated in under 30 seconds.
How to Customize It
The four variables that most affect the output quality are:
- Material + finish — be specific: "anodized aluminum", "soft-touch matte plastic", "brushed stainless steel with a glossy glass face". Vague materials produce vague renders.
- Background — "white studio" gives the cleanest e-commerce look. "Lifestyle" (e.g., "sitting on a kitchen counter") adds context. "Dark premium" suggests luxury pricing.
- Key feature callout — name the one visual element that makes the product recognizable. For a fitness tracker: "an always-on AMOLED display showing a heart rate graph". For a speaker: "a circular grille with a glowing ring LED".
- Color palette — give it a name or a hex code. "Forest green and brushed copper", "Space gray", "#1A1A2E dark navy with gold trim" all produce distinct and consistent results.
Practical Use Cases
- Investor decks — visualize a product before prototyping to test whether the concept reads well on a slide
- Landing pages — collect emails or pre-orders for a product that doesn't exist yet
- User research — show multiple visual variants to early users and measure which resonates before committing to a design
- App store assets — generate hero images for software products shown inside a device frame
- Social media — product teasers for launches or announcements without a physical sample
Which Models Work Best
This prompt works across all major image generators, but the output style varies:
- DALL-E 3 / GPT Image — cleanest white-background studio shots, best for e-commerce style
- Midjourney v7 — highest photorealism for lifestyle and premium dark backgrounds
- Flux Pro 1.1 — fastest iteration, good for testing color variants quickly
- Stable Diffusion / ComfyUI — most customizable if you want consistent brand colors across multiple renders
Start with whichever model you already use. The formula works with all of them — the variable that matters most is how specific your description is, not which model runs it.
One More Tip
Add "—no text, no labels" at the end if you don't want the model to hallucinate product names or fictional branding on the product surface. Most models will leave text off by default, but this instruction makes it explicit.
Generated Image
فرمول پرامپت
این تمپلیت را کپی کنید و جای خالی داخل براکتها را برای هر محصولی که میخواهید تصویرسازی کنید پر کنید:
Create a photorealistic product concept image of [PRODUCT NAME]: [2-sentence description of what it is and what it does]. Show it as a polished commercial product — [MATERIAL/FINISH] casing, [COLOR SCHEME] color palette, on [BACKGROUND: white studio / lifestyle setting / dark premium]. Include [KEY FEATURE: a display, a button arrangement, a logo area, a charging port, etc.]. Style: product photography, 50mm lens, soft studio lighting, slight shadow underneath. High detail, commercial-ready.نمونه خروجی
در ادامه میبینید که این فرمول برای یک بطری هوشمند آب چه خروجی تولید میکند:
«یک تصویر مفهومی فوتورئالیستیک از یک بطری هوشمند آب با درپوش تصفیهکننده UV-C داخلی ایجاد کن: یک بطری استوانهای باریک که با استفاده از نور فرابنفش درون درپوش آب را استریل میکند. آن را به عنوان یک محصول تجاری پرداختهشده نشان بده — بدنهای از تیتانیوم برسخورده و مشکی مات، روی پسزمینه سفید استودیویی. یک نشانگر LED دایرهای UV که به رنگ آبی روشن است روی درپوش قرار بده و یک ناحیه کوچک برای برندینگ. استایل: عکاسی محصول، لنز ۵۰ میلیمتری، نورپردازی نرم استودیویی، سایه کوچک در زیر محصول. جزئیات بالا، آماده برای استفاده تجاری.»
نتیجه (که در بالا میبینید) یک رندر است که با کار یک عکاس حرفهای محصول قابل تشخیص نیست — و در کمتر از ۳۰ ثانیه تولید شده است.
چطور میتوانید آن را سفارشی کنید
چهار متغیری که بیشترین تأثیر را روی کیفیت خروجی دارند عبارتند از:
- جنس + پرداخت سطح — دقیق بگویید: «آلومینیوم آنودایز»، «پلاستیک مات نرملمسی»، «استنلس استیل برسخورده با روکش شیشهای براق». مواد مبهم رندرهای مبهم تولید میکنند.
- پسزمینه — «استودیوی سفید» تمیزترین ظاهر فروشگاهی را میدهد. «محیط زندگی» مثلاً «روی کانتر آشپزخانه» زمینه را فراهم میکند. «پریمیوم تیره» حس قیمت بالا را منتقل میکند.
- نشان دادن ویژگی کلیدی — همان عنصر بصری را نام ببرید که محصول را قابل تشخیص میکند. مثلاً برای ردیاب تناسب اندام: «یک نمایشگر همیشهروشن AMOLED که نمودار ضربان قلب نشان میدهد». برای اسپیکر: «یک گریل دایرهای با حلقه LED نورانی».
- پالت رنگی — یک نام یا کد هگز به آن بدهید. «سبز جنگی و مس برسخورده»، «اسپیس گری»، «#1A1A2E سرمهای تیره با حاشیه طلایی» همه خروجیهای متمایز و یکنواخت تولید میکنند.
کاربردهای عملی
- دکهای سرمایهگذاری (Investor decks) — محصول را قبل از نمونهسازی اولیه تصویرسازی کنید تا ببینید آیا مفهوم روی اسلاید خوب به نظر میرسد.
- لندینگ پیجها — برای محصولی که هنوز وجود ندارد ایمیل یا پیشسفارش جمعآوری کنید.
- تحقیقات کاربری — انواع بصری مختلف را به کاربران اولیه نشان دهید و اندازه بگیرید کدامیک بیشتر جذب میکند قبل از اینکه به طراحی نهایی متعهد شوید.
- داراییهای اپاستور — تصاویر hero برای محصولات نرمافزاری که داخل فریم یک دستگاه نشان داده میشوند تولید کنید.
- شبکههای اجتماعی — تیزرهای محصول برای رونمایی یا اعلامیهها بدون داشتن نمونه فیزیکی.
کدام مدلها بهتر عمل میکنند
این پرامپت روی همه تولیدکنندههای تصویر اصلی کار میکند، اما سبک خروجی متفاوت است:
- DALL-E 3 / GPT Image — تمیزترین عکسهای استودیویی با پسزمینه سفید، بهترین برای ظاهر فروشگاهی
- Midjourney v7 — بالاترین میزان فوتورئالیسم برای پسزمینههای محیط زندگی و پریمیوم تیره
- Flux Pro 1.1 — سریعترین تکرار، خوب برای تست سریع انواع رنگی
- Stable Diffusion / ComfyUI — بیشترین قابلیت سفارشیسازی اگر میخواهید رنگهای برند در چندین رندر ثابت بمانند
با هر مدلی که از قبل استفاده میکنید شروع کنید. این فرمول با همه آنها کار میکند — متغیری که بیشترین اهمیت را دارد این است که توضیحات شما چقدر دقیق است، نه اینکه کدام مدل آن را اجرا میکند.
یک نکته دیگر
در انتها «— بدون متن، بدون برچسب» اضافه کنید اگر نمیخواهید مدل روی سطح محصول اسمهای ساختگی یا برندینگ تخیلی تولید کند. بیشتر مدلها بهطور پیشفرض متن را حذف میکنند، اما این دستورالعمل آن را صریح میکند.